
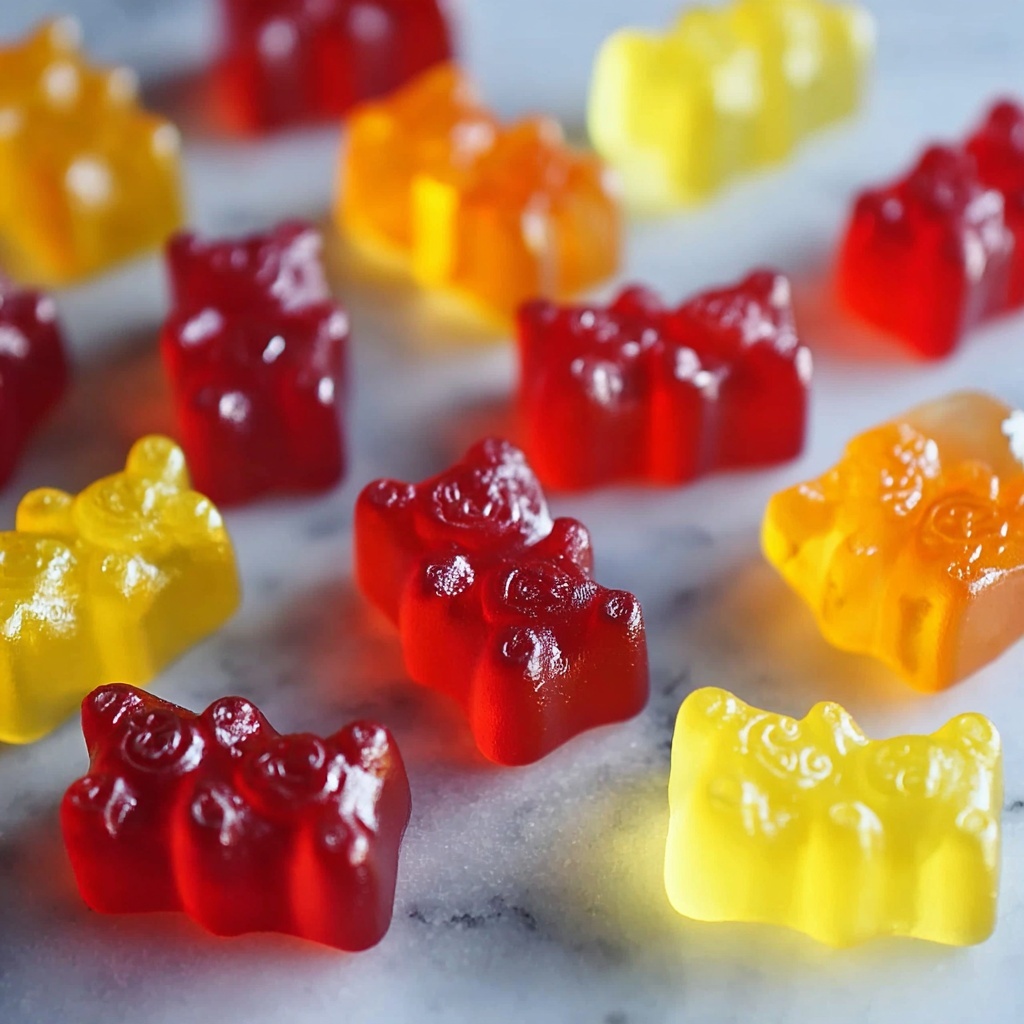
If you’re on the hunt for a fun, nourishing treat that your little ones will absolutely adore, look no further than this Easy Healthy Homemade Gummies Your Kids Will Love Recipe. These fruity, chewy delights combine simplicity and wholesomeness in one delightful bite, offering a naturally sweet snack that you feel good about serving. Packed with real fruit juice and the magic of grass-fed gelatin, this recipe turns snack time into a joyful occasion that kids will eagerly ask for again and again. Plus, the joy of making these gummies yourself means you control exactly what goes in, making it one of the best healthy homemade treats around.
Ingredients You’ll Need
Gathering just a handful of straightforward ingredients, this recipe proves that simplicity does not mean sacrificing flavor or nutrition. Each element plays an important role in delivering those perfectly chewy, fruity gummies your kids will love.
- 1 cup 100% fruit juice: Choose your child’s favorite flavor or blend juices and purees to keep things exciting and naturally colorful.
- 8 teaspoons grass-fed gelatin: This is the secret to giving your gummies their firm, satisfying chew—make sure it’s unflavored for the best taste.
- 2 tablespoons honey: Adds a delicate natural sweetness; you can swap this for maple syrup if you prefer a vegan option.
How to Make Easy Healthy Homemade Gummies Your Kids Will Love Recipe
Step 1: Warm the Juice
Begin by pouring your cup of 100% fruit juice into a small saucepan and warming it gently over medium-low heat. This warming process helps the gelatin dissolve evenly without losing any of the juice’s vibrant flavor. Aim for a temperature just warm to the touch, which usually takes about three minutes.
Step 2: Incorporate the Gelatin
Next, sprinkle in the grass-fed gelatin gradually while whisking vigorously to prevent clumps from forming. Continue stirring until the gelatin is fully dissolved and the mixture becomes clear or just slightly opaque—a sign that it’s ready for the next step.
Step 3: Prepare Your Fruit Puree
If you’re opting for added fruit puree, blend your chosen whole fruit until it reaches a smooth consistency. Measuring your puree into a large bowl or a spouted measuring cup now makes mixing easier later on.
Step 4: Combine the Mixtures
Pour the warm juice and dissolved gelatin blend directly into your fruit puree. Whisk thoroughly until the entire mixture is silky smooth and fully integrated, ensuring every gummy will have a deliciously uniform texture and flavor.
Step 5: Fill Your Molds
Set your silicone gummy molds or an 8×8 glass pan on a sturdy baking sheet to keep things steady. Carefully pour the mixture into each mold, taking care not to overfill. This step is where the fun really starts to take shape!
Step 6: Let the Gummies Set
Pop your molds into the freezer and let the gummies set for about 15 minutes. This quick chill firm ups the mixture beautifully, turning the liquid blend into perfect chewy little treats your kids will be thrilled to munch on.
Step 7: Remove and Store
Once set, gently pop the gummies out of their molds and transfer them to an airtight container. Storing them in the refrigerator keeps them fresh and ready to grab for up to two weeks—making snack time both easy and consistent.
How to Serve Easy Healthy Homemade Gummies Your Kids Will Love Recipe

Garnishes
While these gummies are delightful all on their own, you can dress them up by lightly dusting with a little powdered sugar or rolling them in finely shredded coconut for a fun twist that adds texture and a festive look.
Side Dishes
Pair these gummies with a refreshing glass of milk, a small bowl of yogurt, or even alongside fresh fruit slices. This combo makes for a well-rounded snack or a sweet finisher after lunch or dinner that kids will enjoy.
Creative Ways to Present
Try serving the gummies in colorful cupcake liners or small mason jars for a party or lunchbox surprise. Wrapping them individually in parchment paper makes cute party favors or treats for friends and family too.
Make Ahead and Storage
Storing Leftovers
Keep any leftover homemade gummies sealed tight in an airtight container. The fridge is the best place—they’ll stay fresh and chewy for up to 2 weeks, perfect for snacking throughout the week without worry.
Freezing
If you want to stretch their shelf life, you can freeze the gummies. Place them in a single layer on a baking sheet, freeze until firm, then transfer to a freezer-safe container or bag. Thaw at room temperature for a few minutes before serving for best texture.
Reheating
These gummies don’t require reheating; in fact, warming them too much can affect their texture. Simply enjoy them cold or at room temperature to maintain their delightful chewiness.
FAQs
Can I use flavored gelatin instead of unflavored gelatin?
While flavored gelatin might sound tempting, it’s best to stick with unflavored grass-fed gelatin so you can control the flavor and avoid extra sugars or artificial ingredients. This keeps your gummies genuinely healthy and natural.
What fruit juices work best for this recipe?
Any 100% fruit juice works wonderfully, but orange, grape, or mixed berry juices are particularly popular with kids. Feel free to mix in purees from fruits like mango or strawberries for added texture and sweetness.
Can I make these gummies vegan?
Traditional gelatin comes from animal sources, so for a vegan alternative, you might experiment with agar-agar powder, though the texture may differ. Just keep in mind that the chewiness might not be quite the same.
How long do these gummies last?
Refrigerated in an airtight container, these gummies maintain their freshness for about 2 weeks. Avoid leaving them out at room temperature for extended periods to keep them from becoming sticky or soft.
Is honey necessary in this recipe?
Honey is optional and adds a pleasant, natural sweetness. If you prefer, maple syrup is a great vegan-friendly substitute or you can omit sweeteners altogether if your fruit juice is sweet enough for your little ones.
Final Thoughts
There’s something truly special about making this Easy Healthy Homemade Gummies Your Kids Will Love Recipe that goes beyond just the tasty result. It’s a joyful way to share wholesome snacking, customize flavors, and bring a bit of kitchen magic to your family’s day. Give it a try—you might just find this becoming your go-to treat for happy, healthy kids.
Print
Easy Healthy Homemade Gummies Your Kids Will Love Recipe
- Prep Time: 5 minutes
- Cook Time: 10 minutes
- Total Time: 15 minutes
- Yield: 24 gummies
- Category: Snack
- Method: Stovetop
- Cuisine: American
- Diet: Low Fat
Description
These easy, healthy homemade gummies are a fun and natural treat your kids will love. Made with 100% fruit juice, grass-fed gelatin, and a touch of honey or maple syrup, these chewy gummies are a great alternative to store-bought candies. Quick to prepare and requiring only 15 minutes in the freezer to set, they are perfect for a wholesome snack or a healthy dessert option.
Ingredients
Gummy Mixture
- 1 cup 100% fruit juice (choose your favorite flavor, or mix fruit puree and juice for variety)
- 8 teaspoons grass-fed gelatin (unflavored, to make gummies firm and chewy)
- 2 tablespoons honey (optional; adds natural sweetness; maple syrup can be used as a vegan substitute)
Instructions
- Warm the Juice: Pour 1 cup of your favorite 100% fruit juice into a small saucepan. Warm it over medium-low heat until it’s just warm to the touch, about 3 minutes, taking care not to boil.
- Dissolve the Gelatin: Sprinkle in 8 teaspoons of grass-fed gelatin while whisking constantly. Keep stirring until the gelatin fully dissolves and the mixture looks clear or slightly opaque.
- Prepare Fruit Puree (if using whole fruit): Blend whole fruit until smooth to create a puree. Measure the puree into a large bowl or a spouted measuring cup.
- Combine Mixtures: Pour the warm juice and gelatin mixture into the fruit puree (if using). Whisk everything together until well combined and silky smooth.
- Fill the Molds: Carefully place your silicone molds or an 8×8 glass pan on a baking sheet. Pour the mixture into the molds, filling them without overfilling to avoid spills.
- Set the Gummies: Place the filled molds into the freezer for 15 minutes or until the gummies set firmly.
- Store and Serve: Remove the gummies from the freezer and gently pop them out of the molds. Store them in an airtight container in the refrigerator for up to 2 weeks.
Notes
- You can substitute honey with maple syrup to make the recipe vegan-friendly.
- Using silicone molds makes it easier to remove the gummies once set.
- For a firmer texture, you can slightly increase the gelatin amount but do not exceed 10 teaspoons to avoid overly rubbery gummies.
- Feel free to experiment with different fruit juice flavors and purees for variety.
- Keep gummies refrigerated for optimal freshness and texture.


