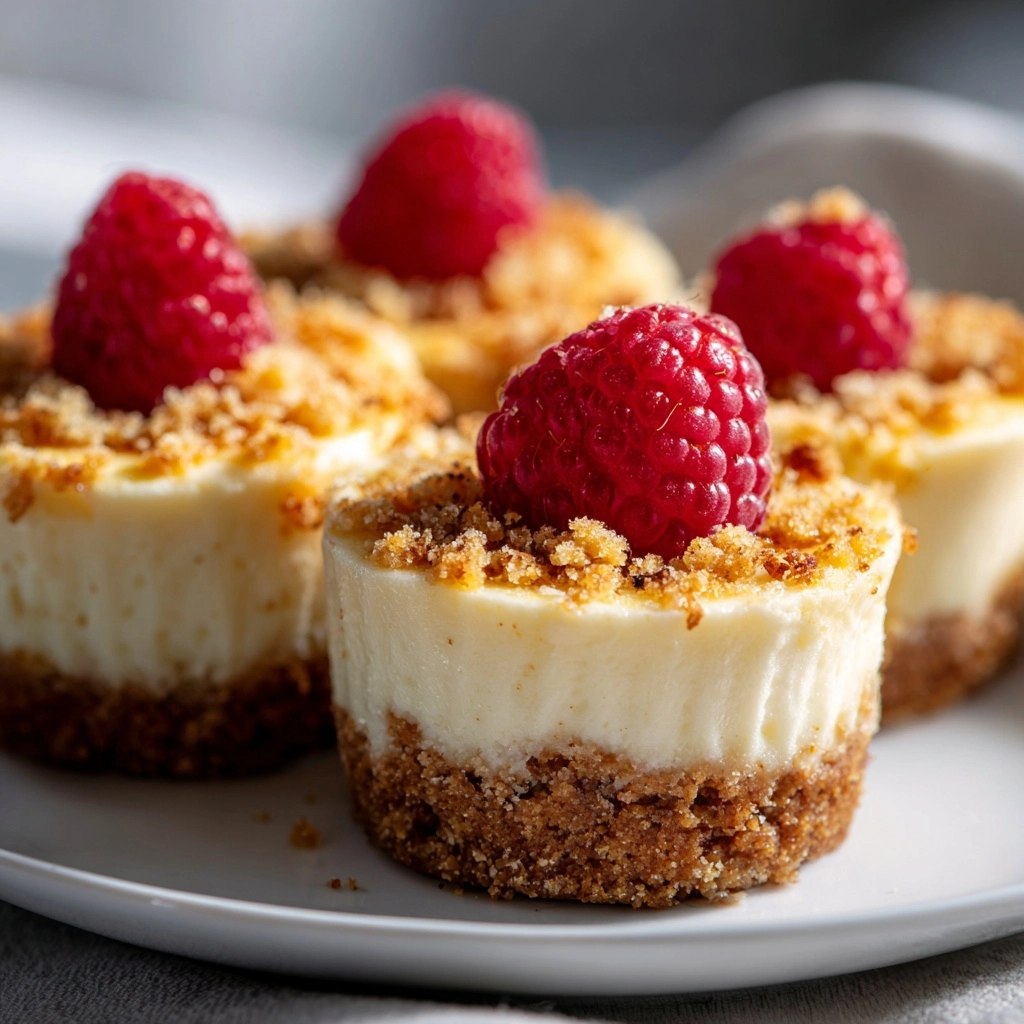
If you’re on the hunt for a show-stopping dessert that’s both celiac-friendly and adorable, these Gluten-Free Mini Cheesecakes are just what your sweet tooth ordered! Creamy, tangy, and perfectly portioned, each bite delivers old-fashioned cheesecake flavor on a tender gluten-free crust—no one will ever guess they’re made without regular graham crackers. They’re a treat you’ll want to serve at family gatherings, parties, or just as a small-batch weeknight indulgence.

Ingredients You’ll Need
What I love most about Gluten-Free Mini Cheesecakes is how straightforward the ingredient list is. Each item, from the graham cracker base to the tangy sour cream, plays a big role in creating a balanced and delectable dessert.
- Gluten-free graham cracker crumbs: For a classic cheesecake crust flavor without any gluten—make sure you use certified gluten-free!
- Melted butter: Acts as the binder for your crust and adds a buttery richness.
- Granulated sugar: Adds sweetness to both the crust and the creamy filling.
- Cream cheese: The star of the show—opt for full-fat, softened cream cheese for that ultra-creamy texture.
- Eggs: These are essential for setting the cheesecake filling while keeping everything luscious and smooth.
- Sour cream: Brings a light tang and velvety finish, balancing the dense richness.
- Vanilla extract: Gives a warm, fragrant note that rounds out the flavor.
- Fresh berries or fruit topping (optional): For a pop of color and a hint of juicy sweetness on top.
How to Make Gluten-Free Mini Cheesecakes
Step 1: Prepare Your Muffin Tin
Kick things off by preheating your oven to 325°F (160°C) and lining a standard 12-cup muffin tin with paper liners. This little step ensures your cheesecakes are easy to pop out and stay picture-perfect. No sticking or mess to worry about!
Step 2: Make the Gluten-Free Crust
In a small bowl, combine your gluten-free graham cracker crumbs, melted butter, and 2 tablespoons of sugar. Mix until everything looks like damp sand. Spoon about one tablespoon of this mixture into each muffin liner and press firmly to create an even crust—using the bottom of a shot glass or a spoon works wonders here. Pop the tray into the oven for 5 minutes, then let it cool slightly while you prep the filling.
Step 3: Whip Up the Cheesecake Filling
Grab a large bowl and beat your cream cheese until it’s silky smooth and lump-free. Gradually add the remaining 1/2 cup sugar and beat until combined. Next, add eggs one at a time, mixing on low speed after each addition and scraping down the sides of the bowl for even blending. Finally, gently fold in the sour cream and vanilla extract until you have a glossy, creamy batter.
Step 4: Assemble and Bake
Divide your cheesecake filling evenly among the prepared muffin cups, filling each almost to the brim. Bake for 18–20 minutes, or until the centers look set but still jiggle just a touch when you nudge the pan. Remember, a little jiggle means they’ll be ultra-creamy!
Step 5: Chill and Set
Pull the tray from the oven and let the mini cheesecakes cool in the muffin pan for about 30 minutes. Once they’ve cooled a bit, transfer the tray to your fridge to chill the cheesecakes for at least 2 hours (longer is even better) so they set up to that dreamy, dense texture we all adore.
Step 6: Top and Serve
When ready to serve, gently peel off the liners and crown each cheesecake with fresh berries or a spoonful of your favorite fruit compote. Now comes the best part—enjoy!
How to Serve Gluten-Free Mini Cheesecakes
Garnishes
A simple topping of fresh berries is classic and always eye-catching, but you can also get playful with lemon zest, shaved chocolate, or even a swirl of whipped cream. Each choice enhances the mini cheesecakes’ creamy base while adding color and personality.
Side Dishes
Pairing Gluten-Free Mini Cheesecakes with something light like a fresh fruit salad or a crisp sparkling drink works beautifully. They also shine next to coffee or tea, making them a sophisticated finish to a brunch or dinner spread.
Creative Ways to Present
For a party, arrange the mini cheesecakes on a tiered dessert stand or in individual cupcake wrappers. For extra fun, set up a topping bar with sauces, fruits, and sprinkles so guests can create their perfect cheesecake bite.
Make Ahead and Storage
Storing Leftovers
Store any extra Gluten-Free Mini Cheesecakes in an airtight container in the fridge for up to 4 days. Their texture actually improves overnight, soaking up all that delicious flavor.
Freezing
These mini cheesecakes freeze beautifully! Simply wrap each cooled, un-garnished cheesecake tightly in plastic wrap and place them in a freezer-safe bag. They’ll keep for up to 2 months; just thaw overnight in the refrigerator before enjoying.
Reheating
Since cheesecakes are best served chilled (and definitely not hot!), there’s no need to reheat. If frozen, just let them thaw gently in the fridge, then top and serve as usual.
FAQs
Can I use another type Dessert
Absolutely! If you want to skip the graham crackers, try almond flour mixed with a bit of butter and sugar for a nutty, delicious base that’s just as gluten-free.
Is it okay to make Gluten-Free Mini Cheesecakes a day ahead?
Yes, and that’s actually my favorite part about them! These mini cheesecakes taste even better after chilling overnight, making them perfect for prepping ahead for parties or special occasions.
Can I use low-fat cream cheese instead?
You can, but full-fat cream cheese gives the richest, creamiest result. If you opt for low-fat, expect a slightly lighter texture and less decadence.
How do I know when the mini cheesecakes are done baking?
Check for a just-set center with a little jiggle (don’t wait until they’re totally firm). They’ll continue to firm up as they cool and chill, which keeps the final texture creamy, not dry.
Are Gluten-Free Mini Cheesecakes safe for people with celiac disease?
As long as you use certified gluten-free ingredients (especially for the graham cracker crumbs), these are a safe treat for anyone avoiding gluten due to celiac disease or gluten sensitivity.
Final Thoughts
Once you try making these Gluten-Free Mini Cheesecakes, you’ll see just how easy and rewarding homemade treats can be—even without gluten. I hope you whip up a batch soon and share these little bites of creamy happiness with your favorite people!