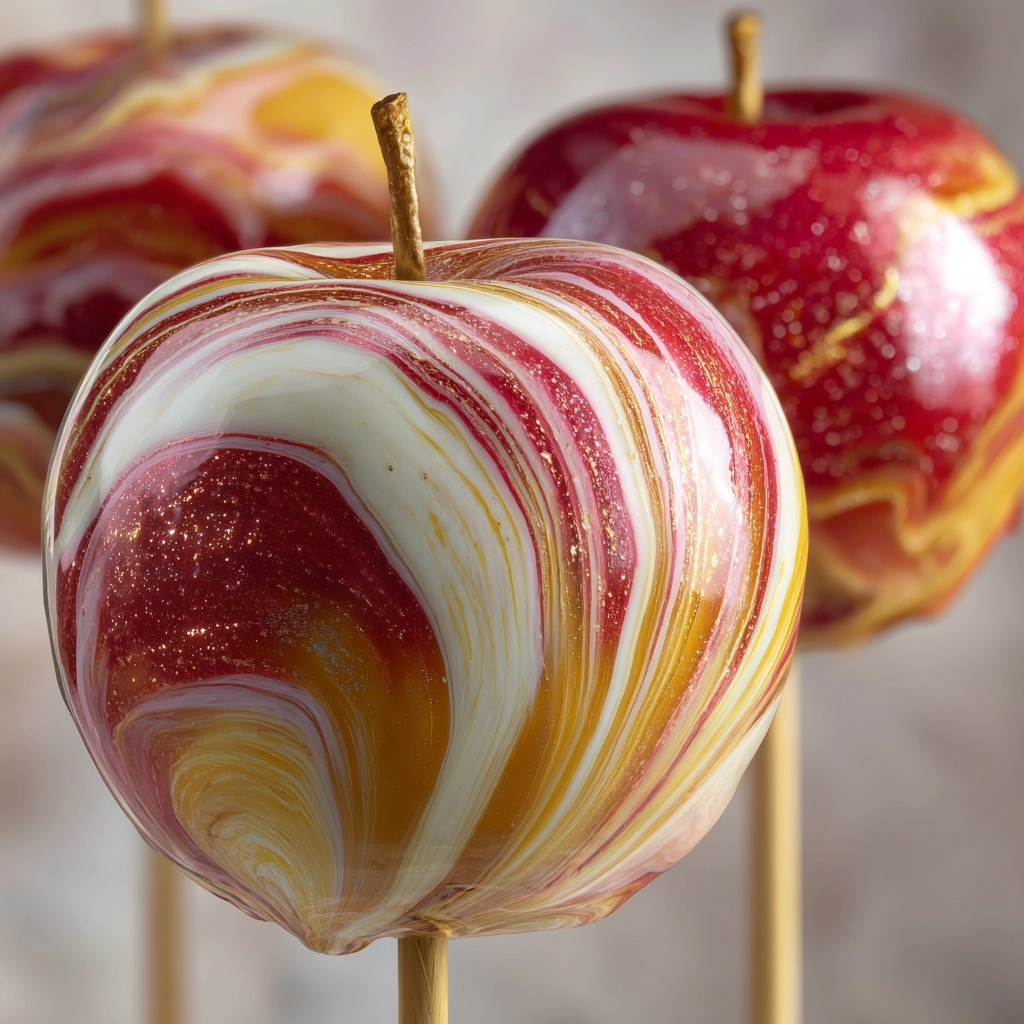
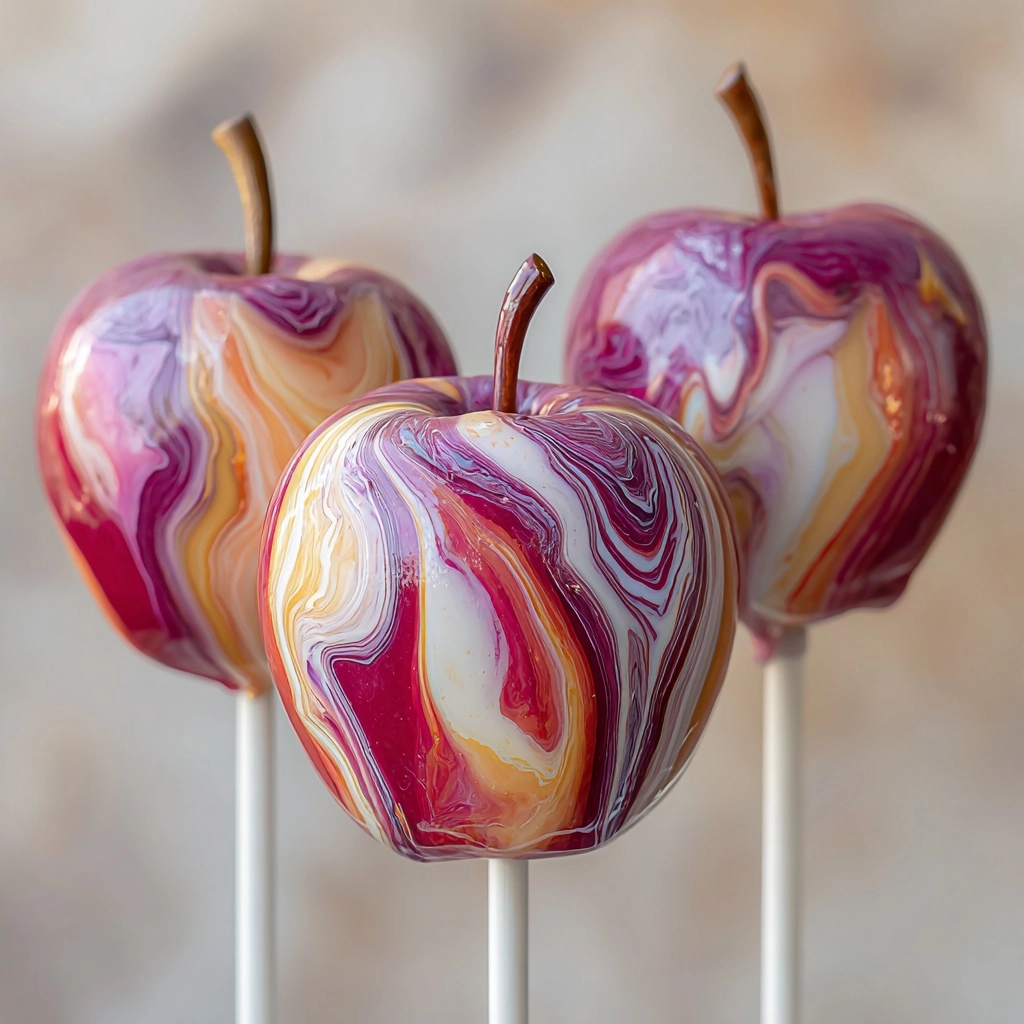
If you love classic candied apples but want a show-stopping twist, Marbled Effect Candy Apples are your new go-to treat. Each one shimmers with mesmerizing streaks of color, creating edible works of art that are as fun to make as they are to eat. Whether you’re planning a party, surprising the kids, or just in the mood for something playful and sweet, these apples deliver crisp tartness encased in a crackly, vibrant shell. Easy enough for beginners but glamorous enough to impress, Marbled Effect Candy Apples will instantly become a dessert-table centerpiece and a conversation starter.
Ingredients You’ll Need
-
Apples:
- 6 medium apples (Granny Smith or Honeycrisp work well)
Candy Coating:
- 2 cups granulated sugar
- 1/2 cup light corn syrup
- 3/4 cup water
- 1/2 teaspoon vanilla extract
- Gel food coloring in at least two colors
Additional:
- 6 wooden sticks
- Cooking spray or parchment paper for drying
How to Make Marbled Effect Candy Apples
Step 1: Prep the Apples and Your Workspace
Wash each apple thoroughly and dry them completely with a clean towel—any wax or moisture can prevent the candy from sticking. Insert a wooden stick into the top of every apple, pushing it in securely but not all the way through. Place them on a baking sheet lined with parchment paper or lightly sprayed with cooking spray to prevent sticking. Having everything ready before you start cooking is truly key when working with hot candy!
Step 2: Make the Candy Shell
In a medium heavy-bottomed saucepan, combine granulated sugar, light corn syrup, and water. Set the pan over medium heat and stir gently until the sugar has dissolved. Attach a candy thermometer to the side of your pan—this is a must for perfectly glossy, shatteringly crisp shells.
Step 3: Heat to Hard Crack Stage
Raise the heat and bring your syrup to a rolling boil, but don’t stir it now. Let the thermometer do its thing and watch as the mixture bubbles up. Once it hits 300°F (the hard crack stage), usually after 15–20 minutes, carefully remove the pot from heat. This is the temperature sweet spot for that coveted glassy crunch!
Step 4: Color and Marble the Candy
Stir in the vanilla extract, then quickly divide the hot syrup between two (or more) heatproof bowls. Add a different color of gel food coloring to each bowl and swirl together by drizzling one color into another—don’t fully mix, or you’ll lose the marbled magic! Work quickly, as the candy will start to set as it cools.
Step 5: Dip and Decorate
Holding each apple by the stick, dip it into the marbled candy mixture. Rotate gently to coat all sides and watch as colorful patterns appear. Lift each apple, letting excess candy drip off, and set onto your prepared baking sheet. For extra dazzle, sprinkle with edible glitter or shimmer dust before the candy hardens. Let the apples cool and harden completely before serving or displaying your Marbled Effect Candy Apples.
How to Serve Marbled Effect Candy Apples
Garnishes
Go all out with fun toppings! Edible glitter, shimmer dust, crushed freeze-dried fruit, or even a light dusting of powdered sugar can take your Marbled Effect Candy Apples to fairytale-level dazzling. Remember, a little sparkle goes a long way without hiding those beautiful marbled patterns.
Side Dishes
Pair your candy apples with a crisp cheese platter or a handful of roasted nuts for a snack spread that perfectly balances sweet and savory. For dessert tables, try serving them alongside mini cheesecakes or chocolate-dipped strawberries—it’s a color and flavor extravaganza!
Creative Ways to Present
Want head-turning presentation? Nestle each Marbled Effect Candy Apple in its own cupcake liner and display them on a tiered stand, or tuck them into clear cellophane bags tied with colorful ribbon for a party favor everyone will remember. Group apples of different colorways for a truly eye-catching centerpiece.
Make Ahead and Storage
Storing Leftovers
Store Marbled Effect Candy Apples in a cool, dry place and avoid stacking them so the candy coating stays pristine. An airtight container works best, just be sure each apple is separated by parchment paper. For maximum crunch, enjoy within 2 days—they’re worth savoring fresh!
Freezing
Unfortunately, freezing isn’t recommended for Marbled Effect Candy Apples. The candy shell doesn’t react well to the temperature change and will likely become sticky or lose its signature crackly texture as it thaws. Stick with cool, dry storage instead.
Reheating
There’s no need (or way) to reheat these beauties—part of their charm is the crisp, hard shell and juicy cold apple inside. If you want to refresh the appearance a bit, simply buff the candy with a dry, soft cloth to restore some of its original shine.
FAQs
How do I prevent the candy coating from sliding off the apples?
Making sure your apples are squeaky clean and absolutely dry is essential! Any moisture or wax can create a slippery barrier, so scrub them well and dry thoroughly before dipping.
Can I use liquid food coloring instead of gel?
It’s best to stick with gel food coloring. Liquid coloring can change the consistency of your candy syrup, resulting in a less vibrant finish or a shell that won’t set as firmly—gel gives you those intense, swirling hues every time.
What other colors look great for Marbled Effect Candy Apples?
Let your imagination run wild! Classic red and white are always stunning, but try pairing turquoise and gold or lavender and pink for a whimsical twist. The marbling technique works with any combination of bold shades you love.
My candy coating hardened before I finished dipping. Can I re-melt it?
If the candy sets before you’re done dipping, you can briefly warm it up in the microwave in 10–15 second bursts—just be cautious not to overheat or burn the syrup. Stir gently and resume your dip-and-swirl routine!
Are Marbled Effect Candy Apples suitable for kids to help make?
Kids will have a blast picking colors and swirling the designs, but because hot syrup is involved, it’s safest for adults to handle the candy cooking and dipping. Let little helpers choose toppings or add glitter once the apples are assembled and cooled.
Final Thoughts
Few treats deliver the wow-factor and nostalgia like Marbled Effect Candy Apples. With dazzling color, crisp coating, and juicy apple crunch, they’re sure to bring out the kid in everyone. Gather your favorite gels, rally your helpers, and dive in—this recipe always leads to big smiles and even bigger memories.