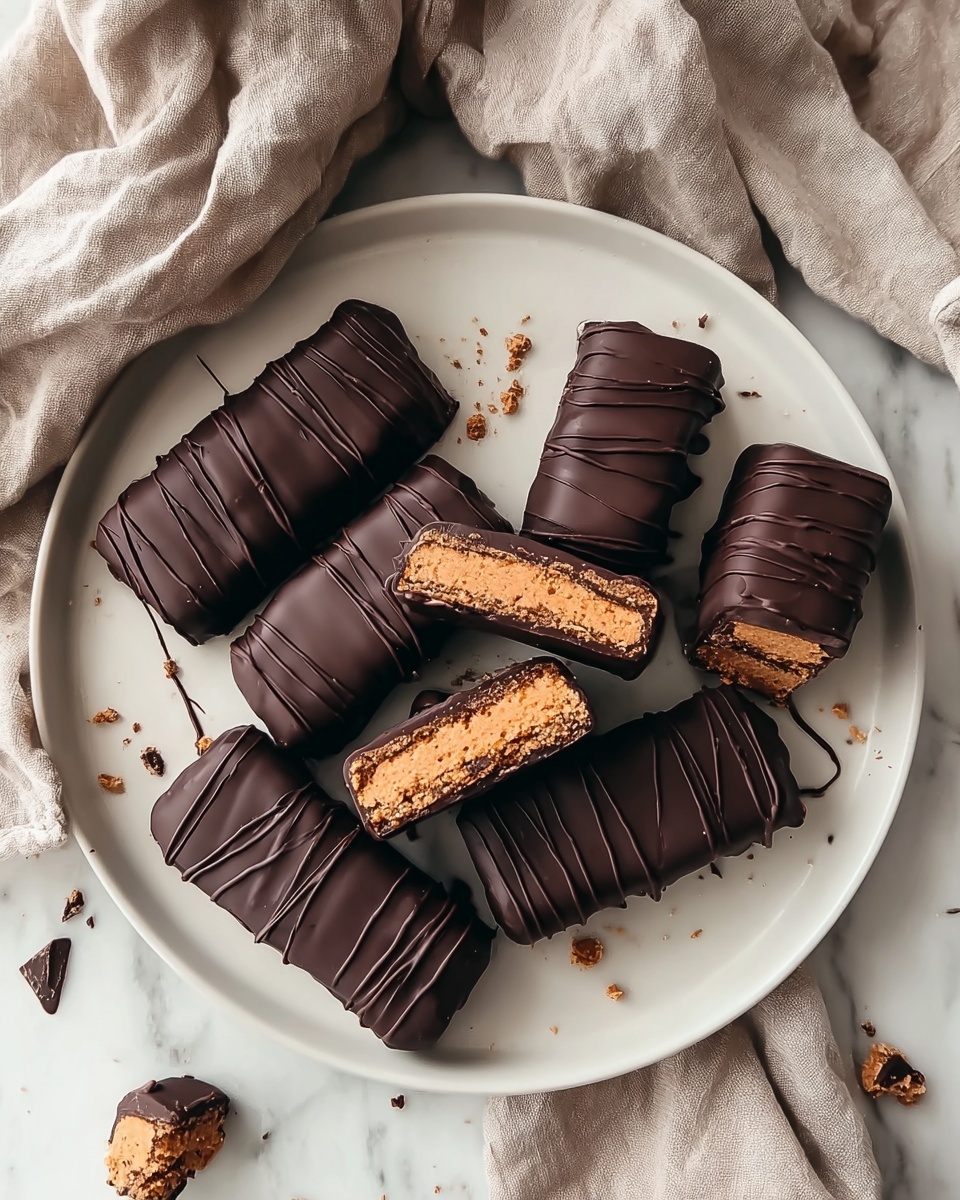
If you’ve ever craved that classic candy bar with its perfectly crunchy, peanut buttery center wrapped in a smooth chocolate shell, then this Healthy Homemade Butterfingers Recipe is about to become your new best friend. It captures all the nostalgia of the original treat but swaps out the mystery ingredients for wholesome, simple ones that you can feel great about. Whether you’re after a guilt-free indulgence, a homemade snack to impress friends, or just a fun kitchen project, this recipe blends peanut butter, honey, and cornflakes into a delightfully crispy, sweet, and salty bar that’s sure to satisfy without any artificial nasties.

Ingredients You’ll Need
Gathering your ingredients for this recipe is a breeze because each one plays a vital role in delivering the perfect balance of flavor and texture. From creamy peanut butter to crunchy cornflakes, every component is essential to replicate that signature Butterfingers bite.
- Peanut butter: Choose natural, creamy peanut butter for rich flavor and smooth blending.
- Honey: Acts as a natural sweetener and helps bind everything together with a touch of floral sweetness.
- Vanilla extract: Adds depth and a warm aroma that enhances all the other flavors.
- Sea salt: Heightens the sweetness and balances the peanut butter’s richness with a subtle savory note.
- Cornflake cereal: Provides the iconic crispy crunch that makes these bars irresistible.
- Chocolate chips: Use dairy-free if you prefer; they create that luscious chocolate coating.
- Coconut oil: Helps melt and smooth the chocolate for an even, glossy coating.
How to Make Healthy Homemade Butterfingers Recipe
Step 1: Heat the Peanut Butter Mixture
Start by gently warming your peanut butter, honey, vanilla extract, and sea salt together in a saucepan over medium-low heat. Stir occasionally as the mixture melds into a smooth, shiny blend. Heating it just right is key to ensuring the ingredients combine perfectly without scorching, setting the stage for a creamy, luscious filling.
Step 2: Combine with Cornflakes
Next, transfer your warm peanut butter mixture into a bowl of cornflakes. Mix gently but thoroughly, making sure some cornflakes get lightly crushed to help everything adhere. This step creates that signature crunchy texture, coating each flake in a sweet, nutty glaze that’s absolutely addictive.
Step 3: Shape Into Bars and Freeze
Take spoonfuls of your mixture and form them into 12 to 14 individual logs or bars. Lining a plate or baking sheet with parchment paper helps keep things tidy. Pop these into the freezer for about an hour so they firm up, making the next steps a breeze.
Step 4: Melt the Chocolate Coating
While your bars chill, melt the chocolate chips with coconut oil until perfectly smooth. This combination not only melts well but also ensures the chocolate sets with a glossy, crackly finish—the kind you want hiding that nutty filling inside.
Step 5: Dip and Set
Now the fun part! Dip each frozen bar into your melted chocolate, letting any excess drip away before placing them back on the parchment. Return them to the freezer for about 10 minutes so the chocolate hardens into the perfect shell.
Step 6: Store and Enjoy
Your Healthy Homemade Butterfingers Recipe is ready to be enjoyed but keeping them stored correctly will maintain their ideal texture. Pop them in the fridge or freezer until you’re ready to dive in for a snack or share with loved ones.
How to Serve Healthy Homemade Butterfingers Recipe
Garnishes
While these bars stand beautifully on their own, a light sprinkle of sea salt over the chocolate before it sets amps up the flavor with a touch of sophistication. You could also try finely chopped peanuts or a drizzle of additional melted chocolate for a decorative finish that tastes divine.
Side Dishes
Healthy Homemade Butterfingers make a fantastic sweet treat alongside a cup of coffee or tea. They also pair wonderfully with fresh fruit or a small serving of Greek yogurt to balance indulgence with freshness and creaminess.
Creative Ways to Present
Thinking of gifting these bars or serving at a party? Wrap each one in parchment paper tied with a rustic string or place them in colorful cupcake liners. You could even layer them with wax paper in a decorative tin for a charming homemade gift that everyone will love.
Make Ahead and Storage
Storing Leftovers
These bars keep best when stored in an airtight container in the refrigerator. Cooling helps maintain their crispiness and chocolate shell without getting soggy or sticky. They will stay fresh and delicious for up to a week.
Freezing
If you want to make a batch ahead or freeze extras, these butterfingers perform beautifully in the freezer. Just be sure to layer them with parchment paper so they don’t stick together, and seal tightly. They can last up to 2 months frozen, ready to thaw quickly when a craving strikes.
Reheating
Since these treat bars are best enjoyed cool and crisp, avoid microwaving or heating. Instead, allow frozen bars to thaw in the fridge for about 30 minutes before serving. This keeps the texture perfect and the chocolate coating intact.
FAQs
Can I use crunchy peanut butter instead of creamy?
Absolutely! Using crunchy peanut butter will add even more texture to the recipe and give your Healthy Homemade Butterfingers Recipe an extra nutty bite. Just be sure to mix thoroughly so it coats the cornflakes evenly.
Is it possible to substitute the cornflakes?
You can swap cornflakes for a similar crispy cereal like rice crisps or gluten-free flakes if preferred. The goal is to maintain that crunchy texture that defines butterfingers, so avoid cereals that are too soft or chewy.
How do I make sure the chocolate coating doesn’t crack when bitten?
Melting the chocolate chips with a bit of coconut oil helps keep the coating pliable yet firm. Freezing the bars well before dipping also reduces cracking. When eating, biting gently rather than forcing through will help keep the chocolate shell intact.
Can I make these nut-free?
For a nut-free version, try using sunflower seed butter instead of peanut butter. The flavor will be different but still delicious, and the recipe works just as well to create that crave-worthy crunch.
What’s the best way to keep these bars from sticking together in the fridge?
Storing your Healthy Homemade Butterfingers Recipe in a single layer or separated by parchment paper inside an airtight container prevents sticking. Avoid stacking them directly on top of one another for the best results.
Final Thoughts
Making your own Healthy Homemade Butterfingers Recipe is such a rewarding experience, blending simple ingredients into a treat that tastes indulgent and satisfies cravings without compromise. I hope you find joy in crafting this snack as much as I do, and that it becomes a beloved staple in your kitchen and snack routine. Trust me, once you try these, you’ll never want to buy processed candy bars again!