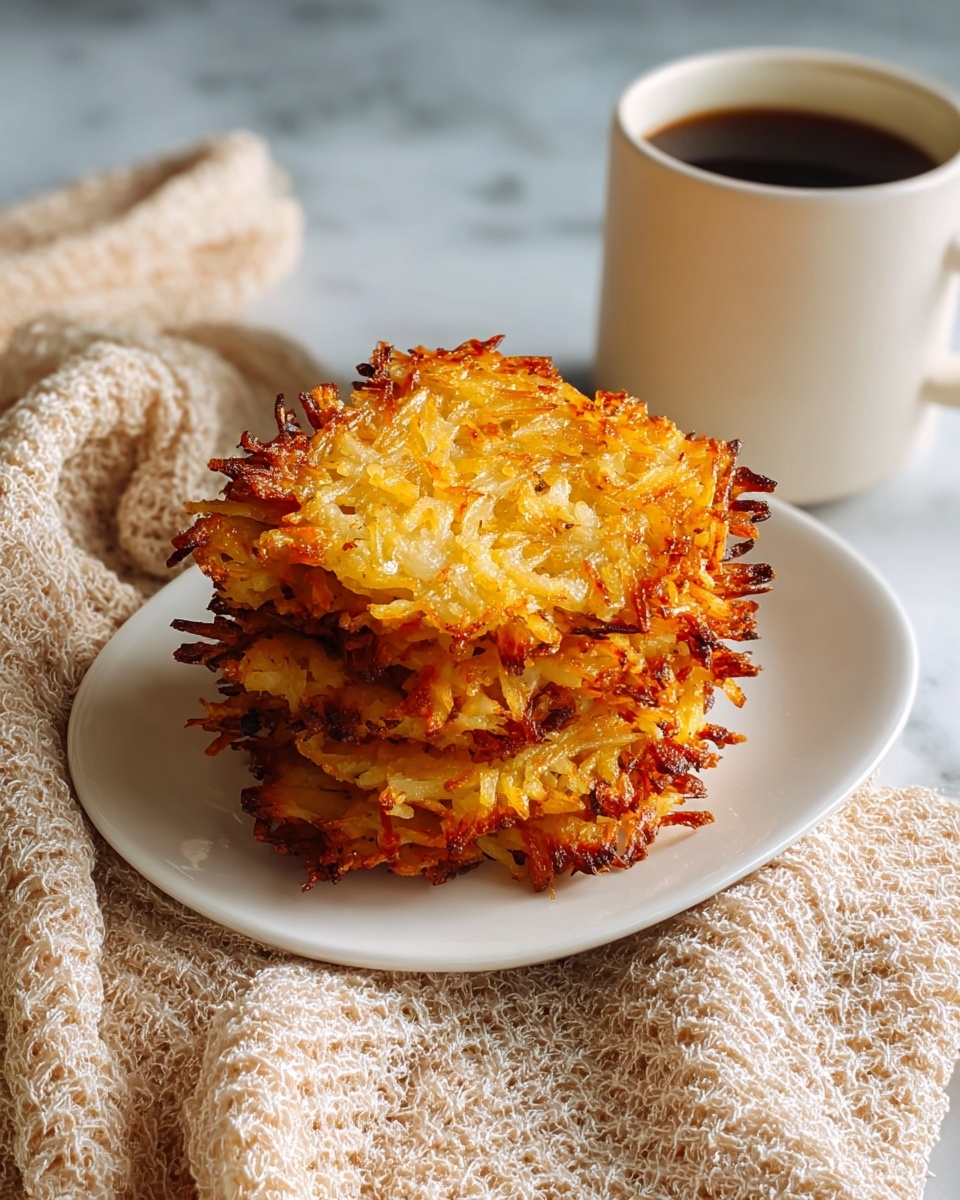
If you’ve been searching for a fun and delicious twist on your morning side, you’ll absolutely love this Wafflemaker Hash Browns Recipe. It transforms humble shredded potatoes into crispy, cheesy golden waffles that are irresistibly crunchy on the outside and tender inside. This recipe combines simple ingredients and the magic of a waffle iron to create breakfast hash browns like you’ve never seen before, perfect for any day you want to impress yourself or your loved ones with an easy yet spectacular dish.

Ingredients You’ll Need
These ingredients are delightfully straightforward, each playing a crucial role in crafting the perfect texture, flavor, and color of your Wafflemaker Hash Browns Recipe. From the creamy sharpness of cheddar to the warmth of garlic powder, this combo hits all the right notes.
- Shredded Potatoes (2 cups, about 2 medium russets): The starchy base that crisps up beautifully when cooked.
- Shredded Cheddar Cheese (1 cup): Adds melty richness and a tangy punch that binds the potatoes together.
- Chopped Onions (¼ cup): Provides a sweet and savory depth to every bite.
- Garlic Powder (½ teaspoon): Offers a subtle aromatic warmth without overpowering.
- Salt (½ teaspoon): Enhances all the flavors perfectly.
- Black Pepper (¼ teaspoon): Adds just a hint of gentle heat and complexity.
How to Make Wafflemaker Hash Browns Recipe
Step 1: Heat Up Your Waffle Maker
Turn your waffle iron to its highest setting and let it preheat fully. A hot waffle maker is essential to getting those signature golden, crispy edges that crunch so satisfyingly with every bite.
Step 2: Mix Your Ingredients
In a mixing bowl, combine the shredded potatoes, cheddar cheese, chopped onions, garlic powder, salt, and black pepper. Make sure the mixture is well blended so every bite is a perfect balance of flavors and texture.
Step 3: Prepare the Waffle Iron
Lightly grease your waffle maker with cooking spray or a bit of oil to prevent sticking. This extra step ensures your hash browns come out intact and release easily after cooking.
Step 4: Scoop and Spread the Mixture
Use about half a cup of your hash brown mixture for each waffle. Spread it evenly across the surface inside the waffle iron to create consistent thickness which will help it cook evenly and crisp up beautifully.
Step 5: Cook Until Crispy and Golden
Close the waffle maker and cook for 5 to 7 minutes. Keep an eye on the color and texture—when it’s perfectly golden and the edges are crisp, it’s ready to come out.
Step 6: Remove and Let Cool Slightly
Carefully take your hash brown waffles out of the iron and let them rest for a minute or two. This brief cooling period helps set the texture, so they stay crispy without steaming themselves inside the waffle maker.
Step 7: Serve and Enjoy
Serve these waffles hot, paired with your favorite dipping sauce or toppings to enhance their flavor. The combination of crispy exterior and cheesy, fluffy interior will win over breakfast lovers instantly.
How to Serve Wafflemaker Hash Browns Recipe

Garnishes
Sprinkle fresh chopped chives or parsley on top for a pop of color and subtle freshness. A dollop of sour cream or a drizzle of spicy sriracha mayo can also elevate the flavor profile, creating a balance of cool and heat that’s simply irresistible.
Side Dishes
Pair your Wafflemaker Hash Browns Recipe with eggs any style, from sunny-side up to fluffy scrambled, or add crispy bacon for a protein boost. They also complement fresh fruit or a light salad perfectly for a well-rounded brunch.
Creative Ways to Present
Try stacking two or three hash brown waffles with layers of avocado, smoked salmon, or even pulled pork in between for a fun breakfast sandwich. Alternatively, cut them into wedges and serve as a crispy snack for sharing at your next gathering.
Make Ahead and Storage
Storing Leftovers
Leftover Wafflemaker Hash Browns can be stored in an airtight container in the fridge for up to 3 days. Keep them separate and cool to maintain their texture, so they reheat with that same delicious crunch.
Freezing
For longer storage, freeze cooked hash browns in a single layer on a baking sheet before transferring to a freezer bag. This avoids sticking and makes it easy to reheat individual portions when you’re ready.
Reheating
Reheat your hash brown waffles in a toaster oven or conventional oven at 375°F for about 10 minutes to bring back their crispiness. Avoid the microwave if possible, as it can soften the exterior and diminish that perfect crunchy texture.
FAQs
Can I use frozen shredded potatoes for this recipe?
Absolutely! Just be sure to thaw and squeeze out any excess moisture before mixing to avoid soggy waffles.
Do I need to pre-cook the potatoes before using the waffle maker?
No need to pre-cook! The waffle maker cooks the shredded potatoes quickly and crisps them up beautifully on its own.
What type of cheese works best in the Wafflemaker Hash Browns Recipe?
Cheddar cheese is a classic choice for its sharp flavor and melting quality, but feel free to experiment with mozzarella, pepper jack, or even a cheese blend for different tastes.
Can I add other vegetables or ingredients?
Definitely! Finely chopped bell peppers, jalapeños, or herbs like rosemary and thyme can add exciting flavor twists to your hash browns.
Is it necessary to grease the waffle iron each time?
Greasing the waffle iron ensures the hash browns don’t stick and helps create that perfect crispy crust. It’s worth the extra step!
Final Thoughts
The Wafflemaker Hash Browns Recipe is a delightful and easy way to elevate your breakfast or brunch routine, turning simple ingredients into a dish that feels special and utterly satisfying. Once you try this recipe, you’ll wonder why you ever made hash browns any other way. Grab your waffle maker, get mixing, and prepare to fall in love with the crispy-cheesy goodness that awaits!