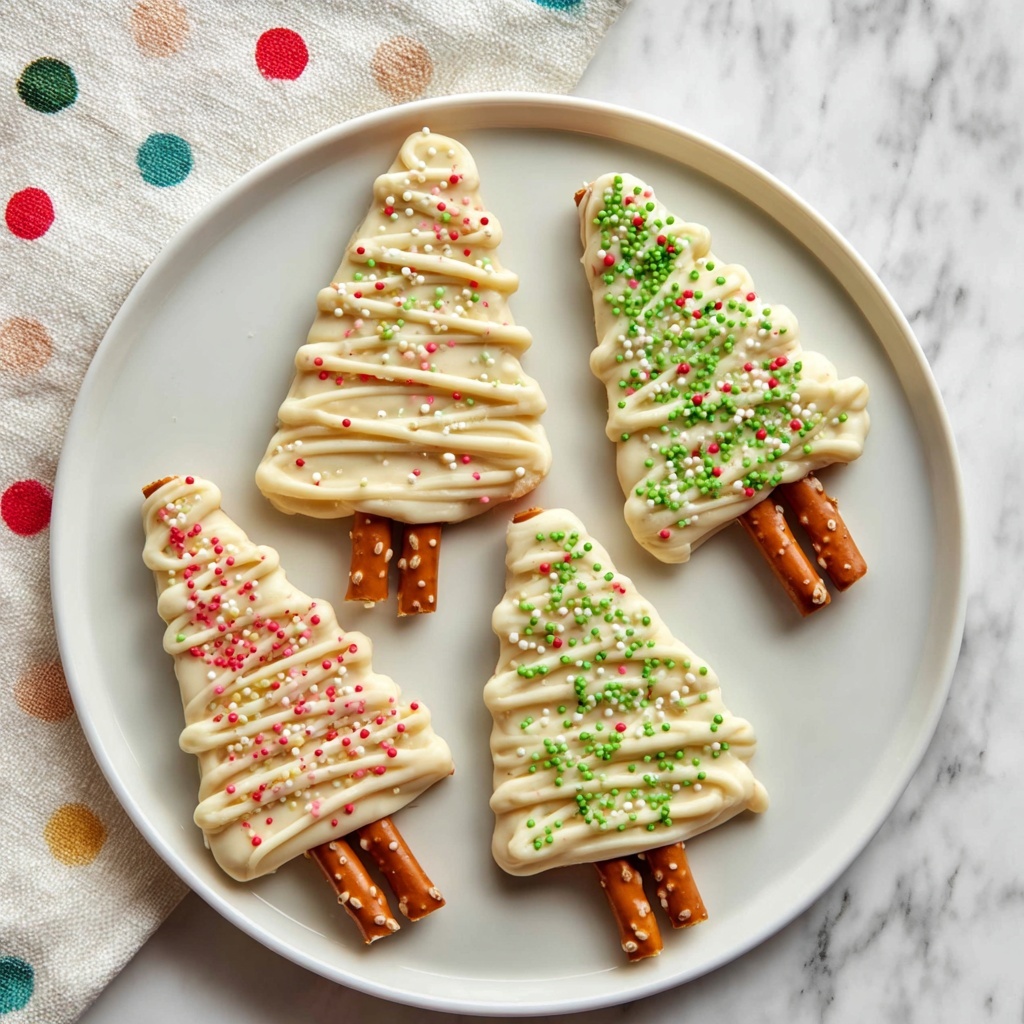
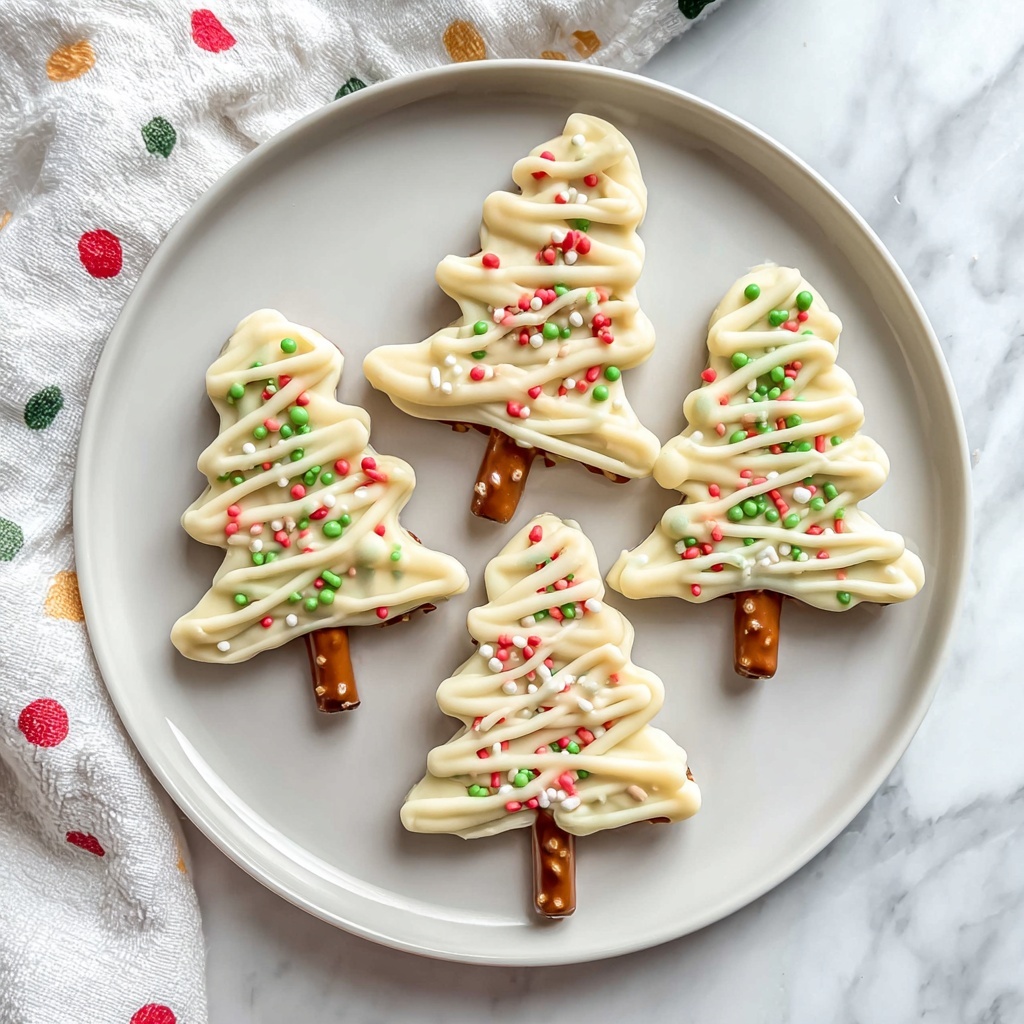
If you’re looking for a festive and delightfully sweet treat to brighten up your holiday celebrations, this White Chocolate Christmas Trees Recipe is an absolute must-try. With its crisp pretzel base, luscious melted white chocolate, and colorful holiday sprinkles, this treat offers the perfect balance of salty and sweet. It’s simple, fun to make, and guaranteed to bring a smile to anyone who bites into these charming edible Christmas trees.
Ingredients You’ll Need
Getting ready to whip up this White Chocolate Christmas Trees Recipe is a breeze because the ingredients are straightforward but essential to achieving that perfect blend of flavors and textures. Each item plays a vital role in turning simple components into festive magic.
- White chocolate chips: Choose high-quality chips for a smooth, creamy melt that creates the base of the tree’s “branches.”
- Pretzel sticks: These give the trees a sturdy trunk and add a salty crunch that contrasts beautifully with the sweetness.
- Holiday sprinkles: Sprinkles add a burst of color and festive sparkle, making each tree look like it’s ready for a holiday party.
- Parchment paper: Essential to prevent sticking and to help your trees set perfectly.
- Piping bag: This makes shaping the melted white chocolate into pretty tree shapes so much easier and more precise.
How to Make White Chocolate Christmas Trees Recipe
Step 1: Prepare Your Workspace
Start by laying out your parchment paper on a flat surface where your decorated trees will rest as they solidify. Make sure your holiday sprinkles and pretzel sticks are open and ready for easy access. Having all your materials at hand keeps the process flowing smoothly.
Step 2: Melt the White Chocolate
Pour your white chocolate chips into a microwave-safe bowl and carefully melt them in the microwave. Heat in 30-second intervals, stirring gently each time to prevent overheating or burning. This ensures silky smooth chocolate that will pipe beautifully onto your pretzels.
Step 3: Fill the Piping Bag
Once your chocolate is melted and silky, transfer it into a piping bag or a resealable plastic bag. Snip off a small tip of the bag’s corner to create a neat opening. This setup makes controlling the flow of chocolate as you create your tree shapes easier and less messy.
Step 4: Arrange the Pretzel Sticks
Place your pretzel sticks upright or flat on the parchment paper with some spacing in between. These will serve as the trunks of your Christmas trees, so keep them steady and well spaced to avoid merging of the chocolate trees.
Step 5: Pipe the Tree Shapes
Using your piping bag, carefully pipe the white chocolate onto the pretzels in the shape of a Christmas tree. Start narrow at the top and widen as you go down, creating the classic triangular silhouette of a tree layered with rich white chocolate.
Step 6: Decorate with Sprinkles
Before the chocolate hardens, sprinkle on your festive holiday sprinkles. Use a generous pinch or two to add pops of color and fun right onto your chocolate trees, bringing them to life with holiday cheer.
Step 7: Let the Trees Harden
Let your chocolate creations sit undisturbed on the parchment paper at room temperature for about two hours so they can harden perfectly. If time is tight, pop them in the refrigerator for around 30 minutes to speed up the process without sacrificing texture.
Step 8: Peel and Enjoy
Once hardened, carefully peel the edges of the White Chocolate Christmas Trees off the parchment paper. They should lift away easily, revealing beautifully shaped, festive treats that are ready to be enjoyed or gifted.
How to Serve White Chocolate Christmas Trees Recipe

Garnishes
For extra flair, consider adding edible glitter or crushed candy canes over the sprinkles for sparkle and seasonal flavor. Fresh rosemary sprigs nearby can enhance the presentation by giving a natural evergreen scent to complement the look of the trees.
Side Dishes
These trees pair wonderfully with a warm cup of spiced hot cocoa or a seasonal punch, creating a cozy holiday snack platter that’s perfect for parties or family gatherings. Their crisp texture also balances out softer desserts beautifully.
Creative Ways to Present
Arrange your White Chocolate Christmas Trees Recipe on a rustic wooden board or bright holiday-themed serving dish. Surround them with pinecones, small ornaments, or even mini gift boxes to make your dessert table instantly festive and inviting.
Make Ahead and Storage
Storing Leftovers
If you have any leftovers, store them in an airtight container at room temperature to maintain their crispness and prevent the chocolate from sweating. Avoid places with temperature fluctuations to keep them looking their best.
Freezing
You can freeze these treats for longer storage by placing them in a single layer on parchment paper inside a freeze-safe container. When ready to eat, thaw them at room temperature to avoid condensation affecting their texture.
Reheating
This recipe is best enjoyed as is since reheating chocolate can alter its texture and cause it to become grainy or melt unevenly. Instead of reheating, consider letting any slightly softened trees set again in the refrigerator for a short time before serving.
FAQs
Can I use other types of chocolate for this recipe?
Absolutely! While white chocolate offers a lovely contrast with the pretzels and sprinkles, you can certainly experiment with milk or dark chocolate. Just be mindful that melting times and taste will vary.
What if I don’t have a piping bag?
No worries—simply fill a resealable plastic bag with the melted chocolate, snip off a very tiny corner, and pipe just like you would with a proper piping bag. It works just as well for shaping these fun treats.
Can I make these with kids?
Yes! This White Chocolate Christmas Trees Recipe is a fantastic activity to do with children. Just make sure an adult handles the melting chocolate and cutting the piping bag tip for safety.
How long do these treats stay fresh?
Stored correctly in an airtight container at room temperature, these Christmas trees should stay fresh and delicious for up to a week, making them perfect to prepare in advance for holiday celebrations.
Can I customize the decorations?
Definitely! Feel free to use different types of sprinkles, edible glitter, or even tiny candy beads to personalize your trees. It’s a great way to add your own holiday flair to the recipe.
Final Thoughts
Making these White Chocolate Christmas Trees Recipe treats is a joyful, simple way to add festive sweetness to your holidays. They’re perfect for sharing with family, gifting to friends, or just savoring as your own special seasonal treat. I truly hope you enjoy making and eating these as much as I do—happy holidays and happy baking!